
Since, by default, GeneratePress does not have or create a hero section for single posts. Therefore, in this article I will show you how to create a single blog post page hero in GeneratePress.
That means, right under the site’s primary navigation, we will create a Hero Area that comprises post’s featured image, displaying blog post title on post’s page with category field and post date.
A hero section is an attention grabber, and must appeal to your visitor’s eyes with the facts that prepare him/her before reading the article/post.
For this activity, you will need GP premium and GenerateBlocks. The free version of GenerateBlocks will be sufficient if you were to create page hero block element and customize using GenerateBlocks.
How To Create Page Hero In GeneratePress?
There are two ways to create a hero section or hero header in GeneratePress;
- Create a dynamic page hero in GeneratePress using Header Element
- Make a GeneratePress Page Hero Block Element, and then customize using GenerateBlocks
For both the methods, GeneratePress premium is required.
If you have the free version of GeneratePress, then I’d highly recommend you to go for GP Premium.
For users who have just started using WordPress, GeneratePress is one of the best option to go for. Since, most beginners are on a budget-friendly hosting plan that does well on WordPress themes with faster performance.
GeneratePress tops the chart for the fastest WordPress themes.
We all agree to the point that GeneratePress is not so feature-rich as Blocksy. But, that’s acceptable against faster performance.
Despite, features like Page Hero, Related Posts, Author Box, Social Share Box, etc. are not built into the theme. You still get a powerful option called Elements. With GeneratePress Elements, you can create and style anything you want.
Take a look at how I created the Latest Posts section on my website’s homepage using GeneratePress Elements and GenerateBlocks.
Creating Single Blog Post Page Hero In GeneratePress
I will show you both the methods, step-by-step.
First, let us see how it is done without using GenerateBlocks.
GeneratePress Page Header For Single Blog Post
Before we start, you should haveGeneratePress premium version. Currently, the GP premium version, at the time of writing is 2.1.2.
Step 1: Create A GeneratePress Header Element
Go to your WordPress Dashboard, hover your mouse on Appearance, and click on Elements.
Once GeneratePress Elements dashboard opens up, click on Add New Element, and select Header Element from the drop-down list.
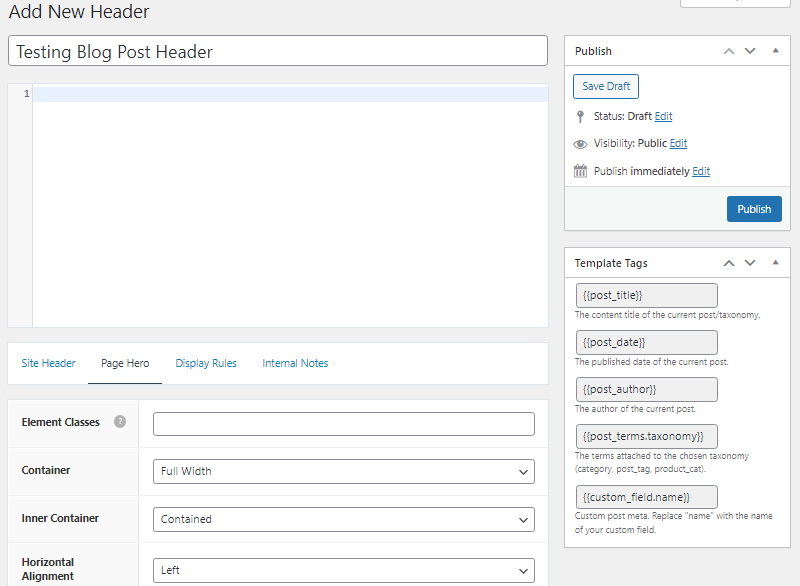
You should see a clean header element like the one above.
A Header Element is used for creating a GeneratePress Site Header and/or Page Hero.
Step 2: Modified Date In GeneratePress Header Element
We all know that at some point in time, you need to update your blog posts.
Updating blog posts is needed because;
- There could an update in the product/service that you’ve written about
- A major technology change might have occurred
- There is more news to the existing blog post you’ve written
- Your readers might want to know more about a specific topic of the article
Several other reasons could be added to this.
Anyways, let us see how to include modified date in the GeneratePress Header Element. So that, each of your updated blog posts display an updated post date.
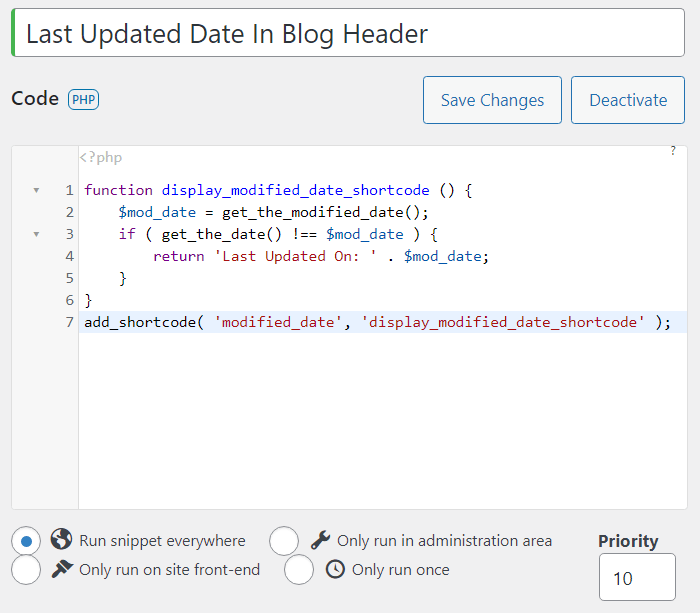
You will need to install a plugin called Code Snippets. For this activity, the free version is more than enough.
Add a New Snippet, and put the following code.
Here’s the code for small screen readers.
function display_modified_date_shortcode () {
    $mod_date = get_the_modified_date();
    if ( get_the_date() !== $mod_date ) {
        return 'Last Updated On: ' . $mod_date;
    }
}
add_shortcode( 'modified_date', 'display_modified_date_shortcode' );
Select ”Run Snippet Everywhere’ and leave to Priority to 10.
In the next step, pay close attention to the Post Date Template Tag. You will need to ‘‘ shortcode below the tag.
Lastly, to keep the post date inline with post author, just add CSS code to the post-date class.
.post-date{
display: inline;
}
This way you can get updated date in GeneratePress blog post header element.
Step 3: Add GeneratePress Header Template Tags
By defaut you get a few template tags when you create a GeneratePress Header Element. They are there to make your work easier.
Rather than adding additional CSS in the theme customizer, you can make use of these template tags like post title, post date, post author. You can also insert custom taxonomy in the header element of custom post type.
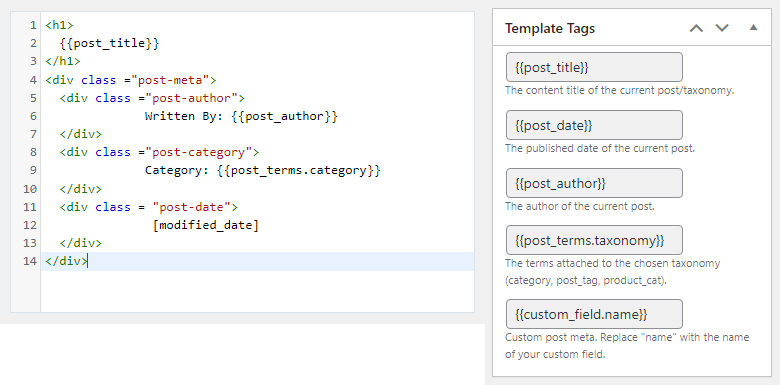
In the above example, I have inserted a post title, post author, category, and a modified date (user-created function). I created a custom function that checks whether the post has been updated, if yes, then it displays the updated date. Otherwise, a normal published date is displayed.
The reason that had to be done is that by default, GeneratePress only offers published date in template tags section.
Step 4: Customize Header Element Layout
To customize the header element, you get settings like full width, contained width layout, and alignment options.
Set the element to Full Width, as the Hero Area has to take up full width of the section. Then select Contained Width for Title and other Post Meta elements. Contained width actual setting is not given here, but it generally picks up from the width set under container layout, in your theme customizer.
Plus, add top and bottom padding to give a proportional height to the element, allowing a good portion of your post’s featured image, title, and other meta elements to fit into it.
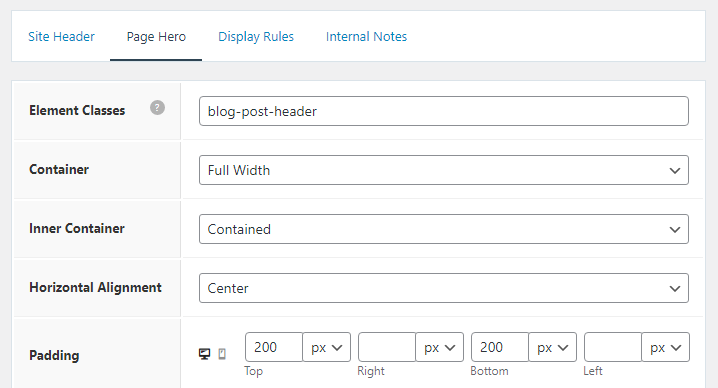
Here, I have selected a Full Width section with Contained Width for my content, Horizontal Alignment for all template tags used 200 pixels of padding on top and bottom for desktop and an overall padding of 50 pixels for mobile devices.
Step 5: Background Image & Customization
To add images to the hero section, you get three options under Background Image;
- No Background Image – Used most likely when a single background color is added
- Featured Image – Mostly used for single blog posts
- Custom Image – This is selected for category pages, search results page, 404 page, etc.
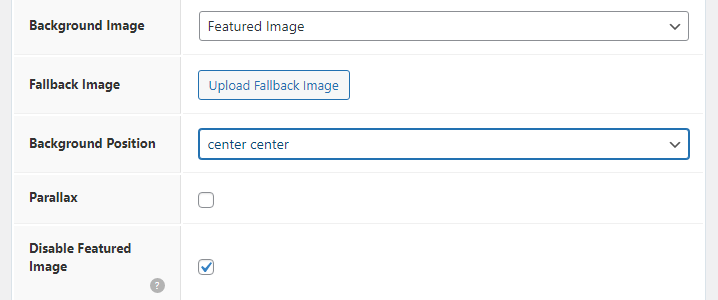
For our activity, we need to choose Featured Image. Apply image background position as center center, and select the check box ‘Disable Featured Image’.
Step 6: Color Customization
Now, you need to apply color customization to your single blog post header element.
It starts with image, and the best way to do it is to apply a black color overlay with an appropriate alpha channel (opacity) on the image. Just enough to make lighter colored text visible on the image.
Remember, we’ve got post title, post author, category, and post date sitting above the image in the center. All of that should be visible to the reader.
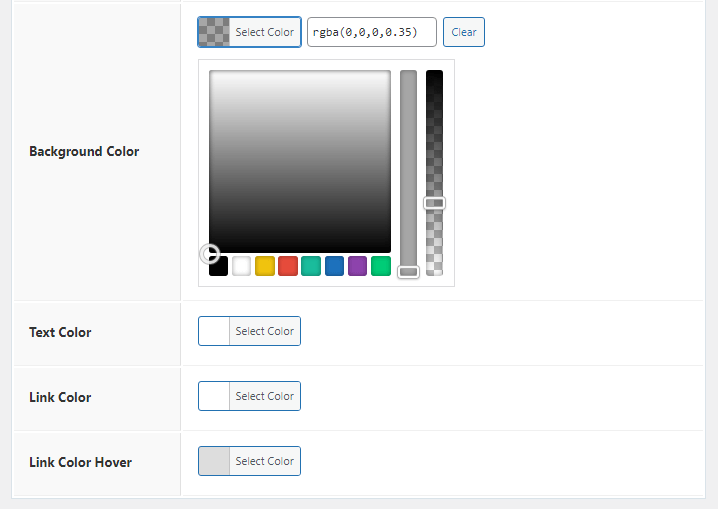
You can different colors for link and text, that’s totally up to you.
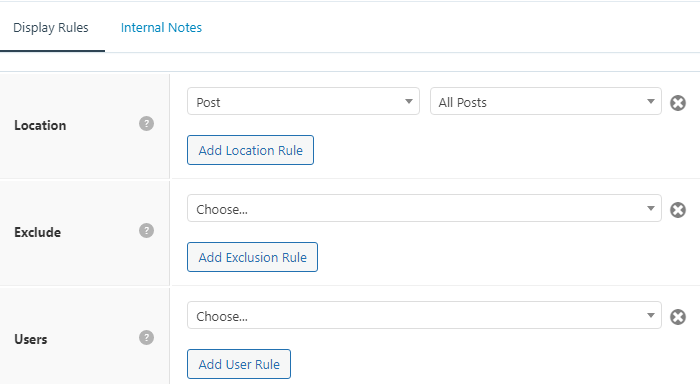
Step 7: Apply Display Rules To Your GeneratePress Header Element
Finally, you need to apply display rules to this single blog post header element.
Since we have created a single blog post page hero, this header element has to be displayed on all blog posts.
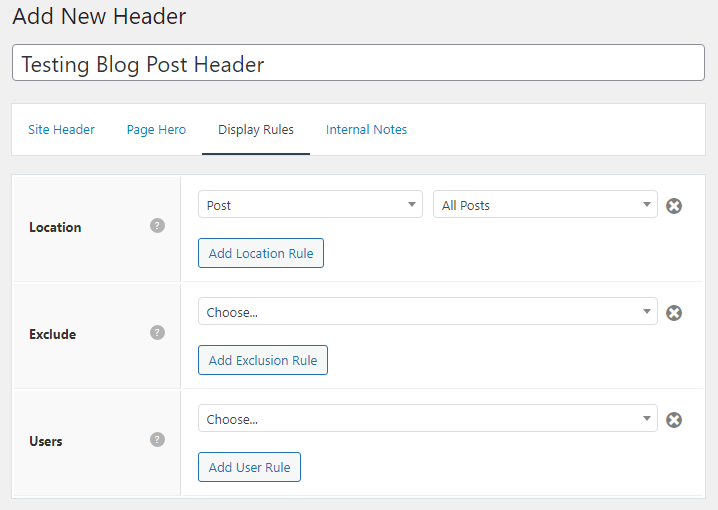
Click on Display Rules tab, and under location select Post. Followed by, All Posts. This will showcase your header element on all blog posts. The featured image, post title, post author, etc., will change dynamically.
After completing all the steps, hit Publish.
Step 8: Verify The Result
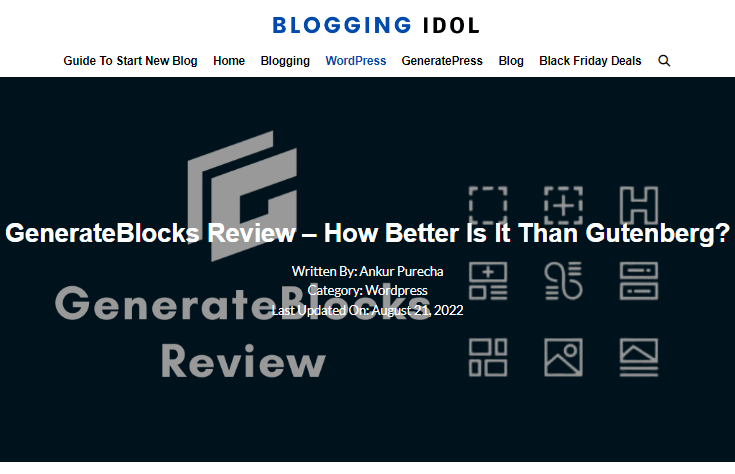
This is from one of my blog posts on the BloggingIdol website. Of course, you can write a couple of CSS lines to vertically align the post meta in such a way that the text within the image is readable.
Now, let us look at the next method. By the way, this one is my favorite.
Because you have total control over GeneratePress page hero customization.
My CSS Codes For GeneratePress Header Element
I have used the GeneratePress Header Element and also defined an Element Class, blog-post-header.
In this class I have used some CSS codes to apply margins on post author, post date, and displayed them both in one line.
	.blog-post-header .post-author, .blog-post-header .post-date
{
	display:inline-block;
	}
.blog-post-header .post-author
{
margin-right: 15px;
}
.blog-post-header .post-date
{
	margin-left: 15px;
}
You can use it to achieve similar results.
Note:- The blog-post-header class can be seen in the image under step 4
Creating GeneratePress Page Hero Using GenerateBlocks
GenerateBlocks is a block-based WordPress plugin released by the GeneratePress development team itself.
It follows a freemium model. We are only going to use the free version of GenerateBlocks. The pro version straight away gives you multiple templates of pre-made Page Hero sections.
But creating a dynamic page hero in GeneratePress using GenerateBlocks doesn’t take that long.
Recently, there had been a major upgrade to the plugin, giving powerful features like Dynamic Data, Query Loop Block and a dedicated Image Block.
See what else they packed into GenerateBlocks, take a quick peek at
Step 1: Create A New GeneratePress Block Element
Go to your WordPress Dashboard, hover your mouse on the Appearance section, and then click on Elements.
You will the GeneratePress Elements Dashboard. From there, click on Add New Element and drop-down the selector to choose Block Element.
Step 2: Set Block Element Type As Page Hero
As soon as you create the block element, go to the left-hand side to change the Element Type from Hook to Page Hero.
Leave Editor Width to 100%. Since page heroes need to be full width.
We want to make this Page Hero from scratch. Therefore, leave the templates part and notice GeneratePress has already chosen a Quick Hook Select and Hook Name, without you doing anything.
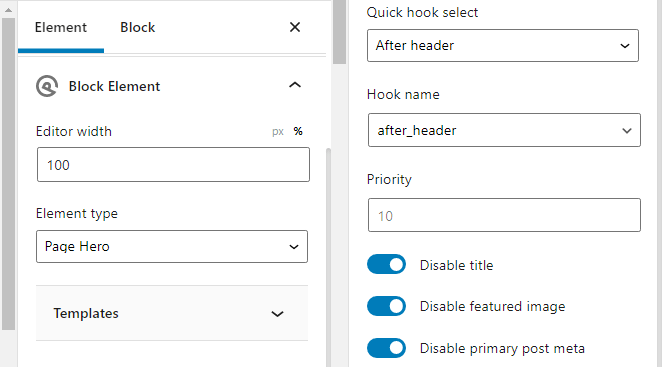
By default, Page Hero has to be placed after the header, and that is what the theme has done.
Under that disable Title, Featured Image, and Primary Post Meta. We will create and customize all of that.
Step 3: Create A GenerateBlocks Container Block & Customize Featured Image
Click on the editor and add a GenerateBlocks Container Block. This block will hold the entire section of page hero with dynamic content.
Apply Top and Bottom Padding of 200 pixels and a Top margin of 10 pixels, to leave some space between the primary navigation and page hero section.
Change Inner Z Index to 1 and choose Black Color background under colors options.
Under Backgrounds section, browse for the featured image, leave Image Size to Full, and change Selector to Pseudo Element.
Finally, reduce Image Opacity anywhere between 0.35 to 0.4. So that the image is visible enough under the black background.
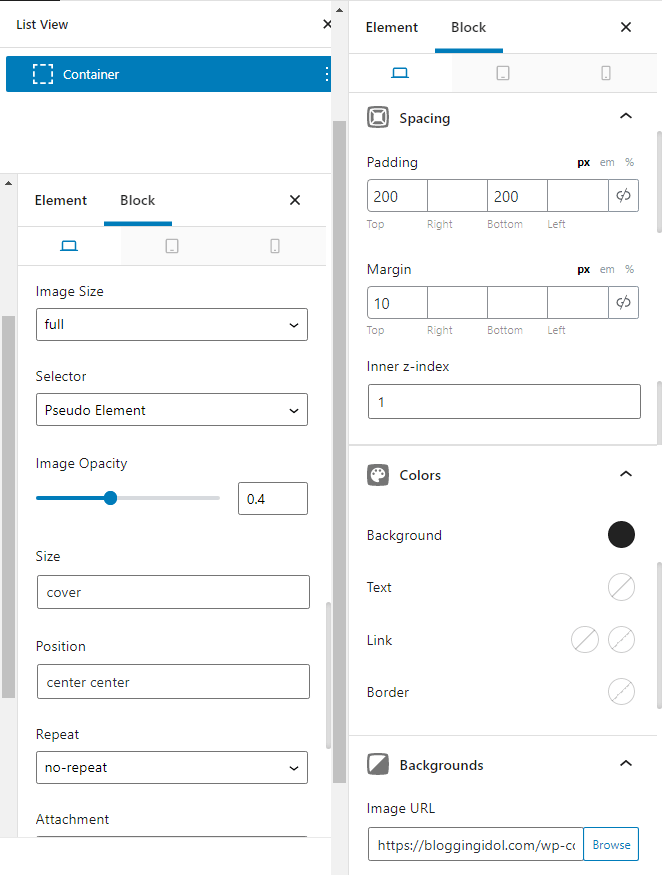
Make the Size to Cover and Position to Center Center with no-repeat.
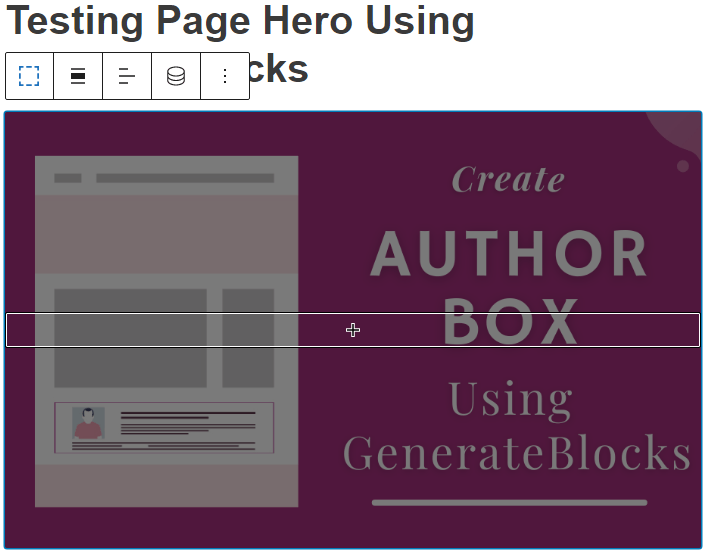
Until now, this is how the hero section will look in the back-end.
Step 4: Add Post Title, Post Author, Category & Post Date To GenerateBlocks Page Hero
We need to add 4 elements;
- Post Title
- Category
- Post Author
- Post Date
From the List View, click on the Container Block and add a Headline Block. Change its Tag Name from H1 to P (paragraph). We are going to use this headline block to display the post category.
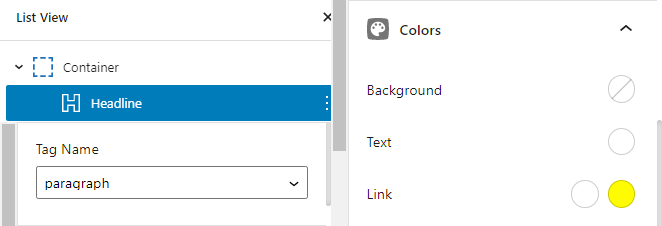
Also, change text color to white and link hover color to yellow.
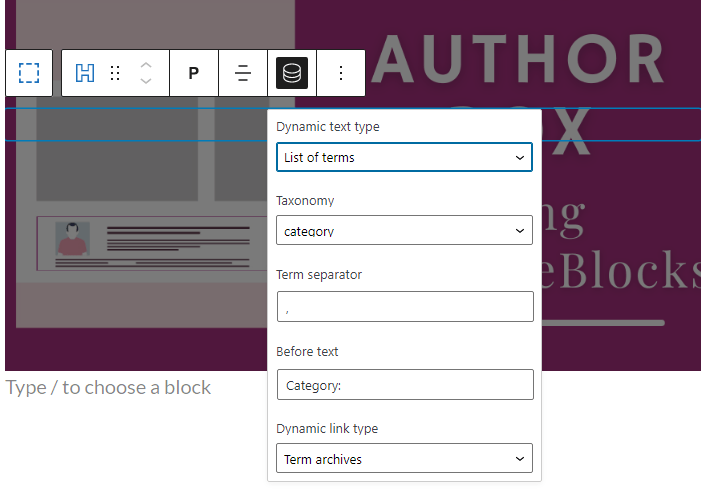
Now click on Dynamic Options and select Dynamic Text Type as List of Terms, Taxonomy as Category, type ‘Category:’ under Before Text field, and select Dynamic Link Type as Term Archives.
Again, add a Headline Block, this time for Post Title. Change the Tag Name to H1, change text color to white. Click on Dynamic Options and select Dynamic Text Type as Title.

For Post Author and Post Date, I’d like to place those elements side by side.
You will need to add another Container Block under the main Page Hero Container Block. In the inner Container Block, add a 2-column Grid Block.
Click on the Inner Container Block, set Inner Container Width to 500 pixels and make the entire container centrally aligned.
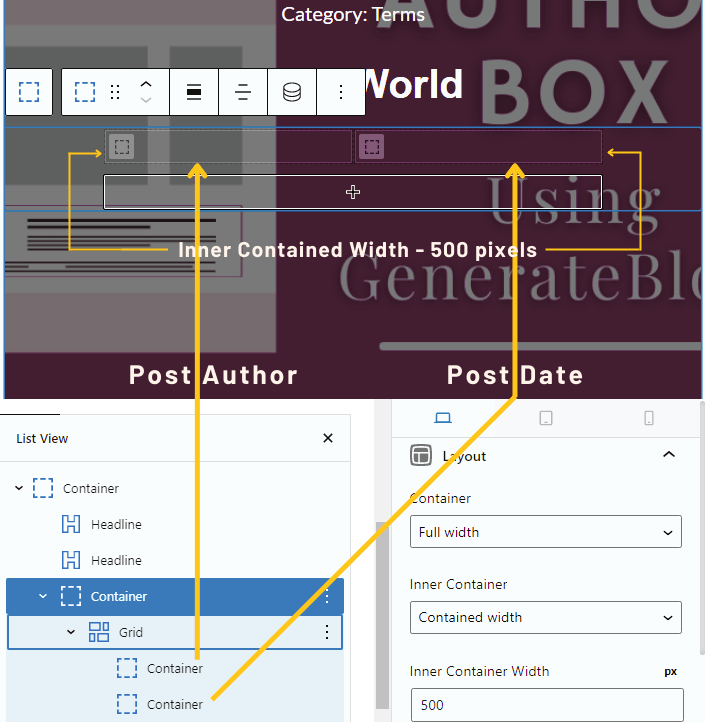
We will be placing elements side by side in single blog post page hero. GenerateBlocks makes it easily possible. You could do it through the previous method, but it would involve coding custom CSS.
In the first container (of the grid block), add a Headline Block, change Tag Name to P (Paragraph), change text color to white and link color to yellow, and finally click on Dynamic Options.
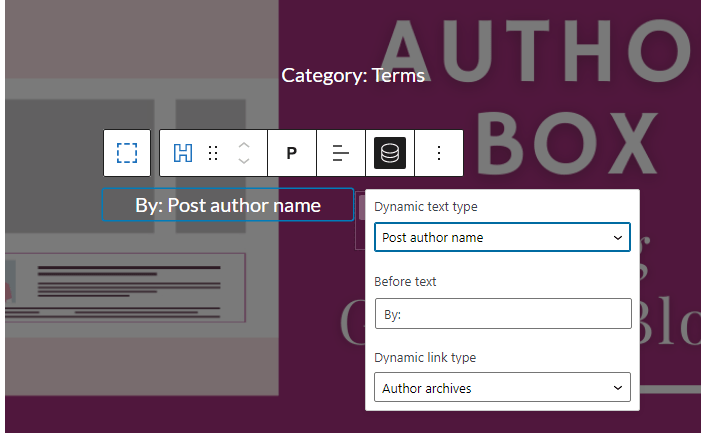
Under Dynamic Options select Dynamic Text Type as Post Author Name, under Before Text field type ‘By:’, and under Dynamic Link Type select Author Archives.
Similarly, for the next container, add Headline Block, click on Dynamic Options and select Dynamic Text Type as Post Date.
While selecting Dynamic Text Type as Post Date, you will see an option a toggle switch that replaces published date to update date.
Toggle the switch to On.
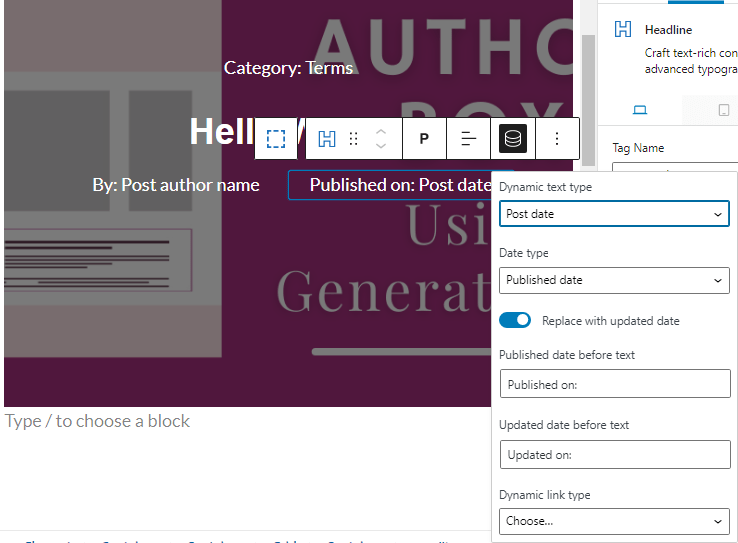
Type ‘Published on:’ and ‘Updated on:’ in before text fields, and you are done.
Customization Part is over.
Step 5: Add Display Location For GenerateBlocks Hero Section
Just like we added the display location for our previous method to all the posts.
Similarly, in the location part, click on Post and then select All Posts. In the end, hit Publish and verify your results.
Step 6: Verify Your Result
Let us look at the front end of a single blog post.

Notice the hover color of link changes with URL at the bottom of the image.
Easier to create single blog post page hero with GenerateBlocks, isn’t it?
The only reason I like to use this method is because customization is a breeze.
By the way, I have GenerateBlocks Pro and I would like to show you some of their pre-made hero block templates.
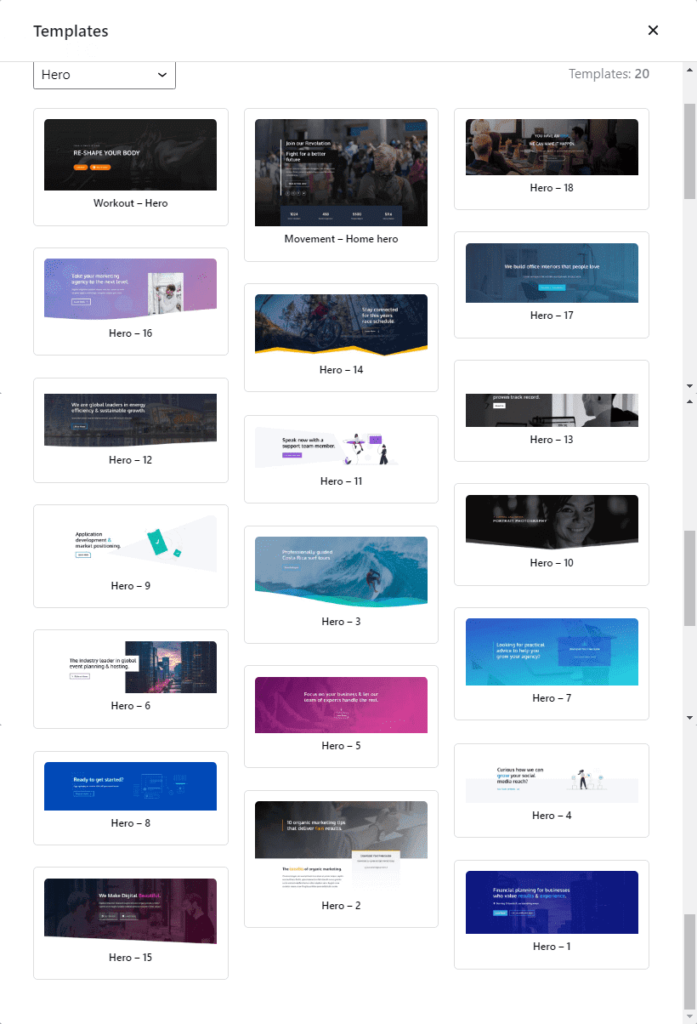
You get 20 pre-made hero block templates, with other sections like author box, headlines with sub-headings and icons, query loop sections, pricing tables, info boxes, testimonial sections, and a lot more.
Conclusion
GeneratePress offers a method of creating page hero – via Header Elements. It is a system built into the theme. I agree that it offers limited customization options. Therefore, I showed you how to create a single blog post page hero using GenerateBlocks.
With GenerateBlocks, I have successfully created
- Latest Posts section on my homepage
- Author Box displayed on each blog post
- Related Posts filtered by category
- Category Pages in GeneratePress
Please check the tutorials for your reference.
I hope you have learnt how to create a single blog post page hero in GeneratePress theme.
Hi Ankur! Great post and thanks for a helpful article. I’m currently tinkering with the Page Hero element in GeneratePress.
I was wondering if you can share what you created to implement [modified_date], please. I’ve seen major websites using a modified date display and wondered how it’s accomplished.
Thanks! 🙂
Hey Marty
I’m glad the article has been helpful for you.
Thanks for letting me know what you wanted. The article has been updated with information on how and where to create [modified_date], and how to apply it into a GeneratePress Header Element.
Plus, I have also shared how to achieve ‘Published on’ and ‘Updated on’ post dates from GenerateBlocks.
Do let me know if there is anything else you need.