In this GenerateBlocks tutorial, I will show you how to create a pros and cons table using GenerateBlocks free version.
This method can be applied on any WordPress theme, be it free or premium version WordPress theme.
Basically, the methodology of creating a pros and cons box in WordPress using GenerateBlocks is for bloggers, affiliate marketers, and review authors, who are beginners.
Steps of pros and cons table using GenerateBlocks
- Create an outer Container block
- Add a two column Grid block
- Give Pros title in Container block
- Write positive points under pros
- Copy all contents and create cons section
- Change color and text of cons section
Why To Create Pros and Cons Table Using GenerateBlocks?
Pros and Cons section describes the benefits and drawbacks of a product and/or service, helping the online reader to take a better decision.
Many digital publishers like bloggers and affiliate marketers write and educate their audience about digital products useful for online businesses.
Be it a a regular blog, Amazon affiliate website, technology or gadget related affiliate site, or simply a review website.
The below three sections are highly required to insert into your content
- Affiliate Box
- Pricing Table
- Pros and Cons Table
All the three have one goal in common; educate your visitor and thereby increase your affiliate product’s conversion.
An affiliate box helps your reader to quickly read through most important features before buying a product.
A pricing table educates your reader about monthly and yearly pricing plans of a product.
Whereas, a pros and cons table tells your reader about the positives and negatives of a product.
Steps of Creating Pros/Cons Table Using GenerateBlocks
For your knowledge, I am creating this pros/cons section on a GeneratePress premium theme using the GenerateBlocks free version.
Note:- I do not recommend you to use reusable blocks, as when you make any changes to the block, it alters the primary saved block.
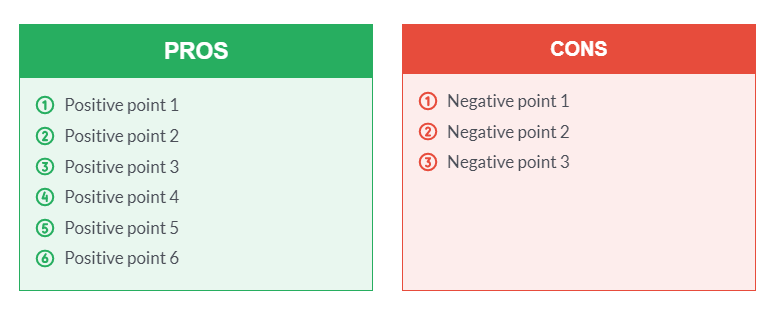
Also, have a look at what we are going to create.
Time needed: 10 minutes
In this ‘how to’ guide, we are going to use GenerateBlocks Container block, Grid block, and Headline block.
- Create an outer Container block
Start by adding a GenerateBlocks Container block. This block will hold the entire pros and cons section.
I am creating pros/cons section on a single blog post which has a right sidebar.
Since, my website’s entire container layout is 1300 pixels, and I’m also using a right sidebar, I will apply contained width of 800 pixels to this container block.
Also, apply overall padding of 10 pixels and bottom margin of 50 pixels.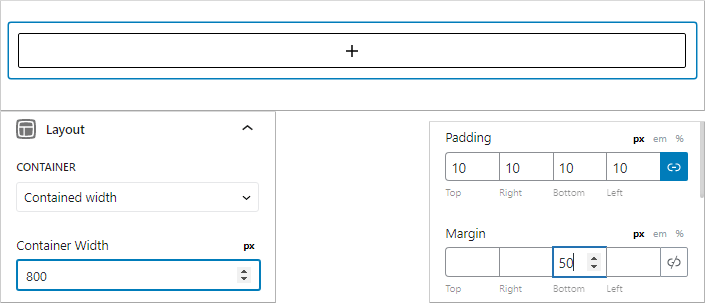
- Add a two column GenerateBlocks Grid block
Within this outer container block, you need to insert a 2 column GenerateBlocks Grid block.
The first column, or first container of this grid block will hold the ‘Pros’ section, whereas the second column, or second container of the grid block will hold the ‘Cons’ section.
Give a horizontal gap of 30 pixels to this grid block.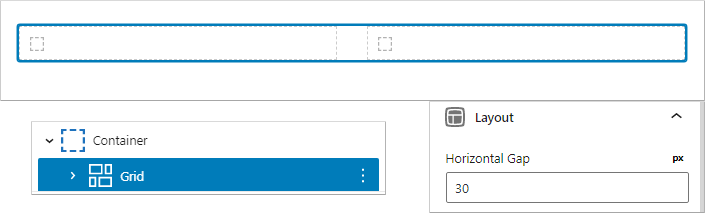
- Add Container block in first container of Grid block
Insert a Container block in the first container of the Grid block.
In this container block we will give a title of ‘Pros’.
Apply background color as 27AE60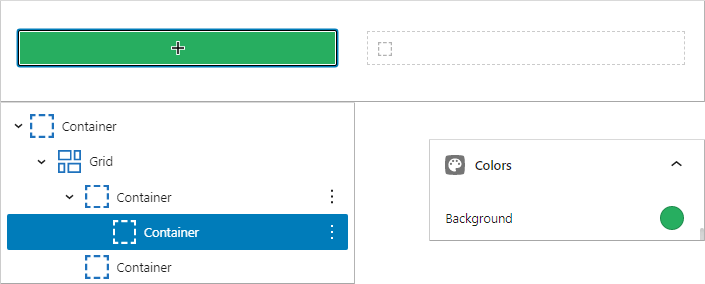
- Insert a GenerateBlocks Headline block
From the list view, click on the container with the green background, and add a GenerateBlocks headline block.
Since, you would have already given a Pros and Cons H2 heading for the section, change this headline block’s tag to H3, and change text color to FFFFFF (white)
Align the headline block to the center, change its font size to 24 pixels, give top and bottom padding of 10 pixels, and finally remove it bottom margin.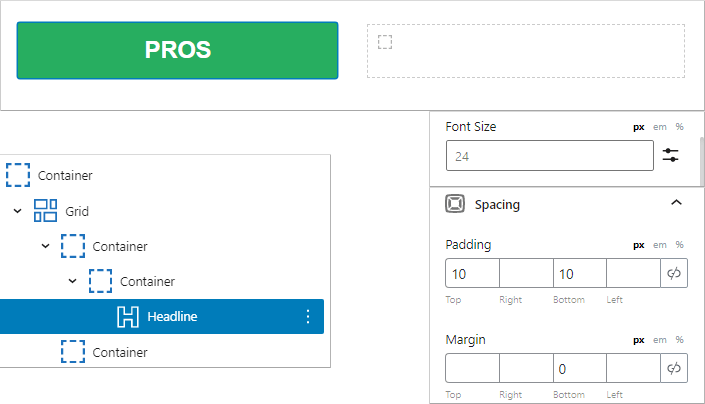
- Insert another Container block in the first container of Grid block
After completing the ‘Pros’ title part, insert another Container block in the first container of the Grid block.
Here we are going to add all the pros icon list.
Customize its over padding, margin, border, and background color.
Customization done are as follows;
Padding – 15 pixels overall
Top margin – 0 pixels
Border width – 2 pixels overall
Background color – E9F7EF
Border color – 27AE60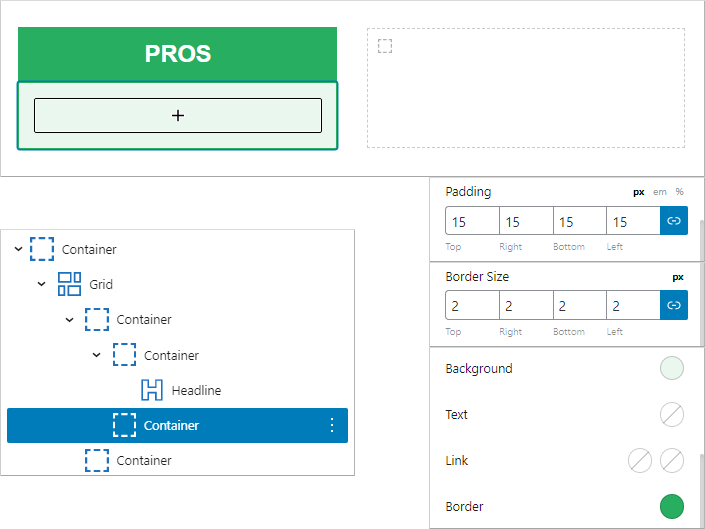
- Insert Headline block to create first icon list point
You do not get a GenerateBlocks Icon List block. Therefore, you need to select a Headline block and add the appropriate icon making it look like a list point.
So, click on the container block which you’ve just added, and insert a Headline block.
Change the tag to paragraph, reduce the font size to 18 pixels.
Add bottom margin of 5 pixels and change the text color to 4B4F58
Now, we want to add icons with numbers. Unfortunately, GenerateBlocks does not that type of SVG icons. So, you will have to get the code from Font Awesome Icons.
Change icon size to 23 pixels.
I will give the codes from number 1 to 6 after all the steps.
- Duplicate the headline blocks
Now, click on the first headline block and just duplicate the headline block to number of pros you have.
Plus, update the SVG icon code and text.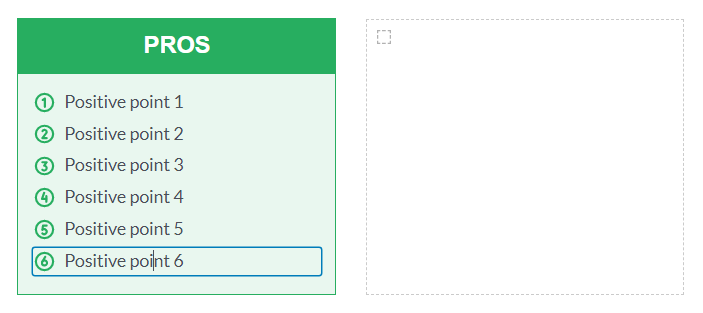
- Copy and Paste to create Cons section
Since, the pros entire container block is ready, just copy selected blocks as shown in the image below.
Now, click on the second container block of the grid block and add a paragraph block.
Later, click on that paragraph block, and paste the copied blocks.
Now, you just need to change the colors and the text accordingly.
Darker color used – E74C3C
Lighter color used – FDEDEC
That’s it. You have successfully created a pros and cons table using GenerateBlocks.
SVG Icons Codes for Numbered Icons in GenerateBlocks
Let me give you the SVG Icon codes.
SVG Icon Code for Number 1
For Green (Pros)

<svg viewBox="0 0 256 256" xmlns="http://www.w3.org/2000/svg"><rect fill="none" height="256" width="256"></rect><circle stroke-width="24" stroke-linejoin="round" stroke-linecap="round" stroke="#27ae60" fill="none" r="96" cy="128" cx="128"></circle><polyline stroke-width="24" stroke-linejoin="round" stroke-linecap="round" stroke="#27ae60" fill="none" points="108 100 132 84 132 176"></polyline></svg>

For Red (Cons)

<svg viewBox="0 0 256 256" xmlns="http://www.w3.org/2000/svg"><rect fill="none" height="256" width="256"></rect><circle stroke-width="24" stroke-linejoin="round" stroke-linecap="round" stroke="#e74c3c" fill="none" r="96" cy="128" cx="128"></circle><polyline stroke-width="24" stroke-linejoin="round" stroke-linecap="round" stroke="#e74c3c" fill="none" points="108 100 132 84 132 176"></polyline></svg>
SVG Icon Code for Number 2
For Green (Pros)

<svg viewBox="0 0 256 256" xmlns="http://www.w3.org/2000/svg"><rect fill="none" height="256" width="256"></rect><circle stroke-width="24" stroke-linejoin="round" stroke-linecap="round" stroke="#27AE60" fill="none" r="96" cy="128" cx="128"></circle><path stroke-width="24" stroke-linejoin="round" stroke-linecap="round" stroke="#27AE60" fill="none" d="M105.9,94.7A24,24,0,0,1,152,104a23.6,23.6,0,0,1-4.1,13.4h0L104,176h48"></path></svg>

For Red (Cons)

<svg viewBox="0 0 256 256" xmlns="http://www.w3.org/2000/svg"><rect fill="none" height="256" width="256"></rect><circle stroke-width="24" stroke-linejoin="round" stroke-linecap="round" stroke="#e74c3c" fill="none" r="96" cy="128" cx="128"></circle><path stroke-width="24" stroke-linejoin="round" stroke-linecap="round" stroke="#e74c3c" fill="none" d="M105.9,94.7A24,24,0,0,1,152,104a23.6,23.6,0,0,1-4.1,13.4h0L104,176h48"></path></svg>
SVG Icon Code for Number 3
For Green (Pros)

<svg xmlns="http://www.w3.org/2000/svg" viewBox="0 0 256 256"><rect width="256" height="256" fill="none"></rect><circle cx="128" cy="128" r="96" fill="none" stroke="#27AE60" stroke-linecap="round" stroke-linejoin="round" stroke-width="24"></circle><path d="M104,84h48l-28,40a28,28,0,1,1-19.8,47.8" fill="none" stroke="#27AE60" stroke-linecap="round" stroke-linejoin="round" stroke-width="24"></path></svg>

For Red (Cons)

<svg viewBox="0 0 256 256" xmlns="http://www.w3.org/2000/svg"><rect fill="none" height="256" width="256"></rect><circle stroke-width="24" stroke-linejoin="round" stroke-linecap="round" stroke="#e74c3c" fill="none" r="96" cy="128" cx="128"></circle><path stroke-width="24" stroke-linejoin="round" stroke-linecap="round" stroke="#e74c3c" fill="none" d="M104,84h48l-28,40a28,28,0,1,1-19.8,47.8"></path></svg>
SVG Icon Code for Number 4
For Green (Pros)

<svg viewBox="0 0 256 256" xmlns="http://www.w3.org/2000/svg"><rect fill="none" height="256" width="256"></rect><circle stroke-width="24" stroke-linejoin="round" stroke-linecap="round" stroke="#27AE60" fill="none" r="96" cy="128" cx="128"></circle><polyline stroke-width="24" stroke-linejoin="round" stroke-linecap="round" stroke="#27AE60" fill="none" points="124 76 100 144 148 144"></polyline><line stroke-width="24" stroke-linejoin="round" stroke-linecap="round" stroke="#27AE60" fill="none" y2="176" x2="148" y1="112" x1="148"></line></svg>

For Red (Cons)

<svg viewBox="0 0 256 256" xmlns="http://www.w3.org/2000/svg"><rect fill="none" height="256" width="256"></rect><circle stroke-width="24" stroke-linejoin="round" stroke-linecap="round" stroke="#e74c3c" fill="none" r="96" cy="128" cx="128"></circle><polyline stroke-width="24" stroke-linejoin="round" stroke-linecap="round" stroke="#e74c3c" fill="none" points="124 76 100 144 148 144"></polyline><line stroke-width="24" stroke-linejoin="round" stroke-linecap="round" stroke="#e74c3c" fill="none" y2="176" x2="148" y1="112" x1="148"></line></svg>
SVG Icon Code for Number 5
For Green (Pros)

<svg viewBox="0 0 256 256" xmlns="http://www.w3.org/2000/svg"><rect fill="none" height="256" width="256"></rect><circle stroke-width="24" stroke-linejoin="round" stroke-linecap="round" stroke="#27AE60" fill="none" r="96" cy="128" cx="128"></circle><path stroke-width="24" stroke-linejoin="round" stroke-linecap="round" stroke="#27AE60" fill="none" d="M152,84H111.8L104,132.2a28,28,0,1,1,0,39.6"></path></svg>

For Red (Cons)

<svg viewBox="0 0 256 256" xmlns="http://www.w3.org/2000/svg"><rect fill="none" height="256" width="256"></rect><circle stroke-width="24" stroke-linejoin="round" stroke-linecap="round" stroke="#e74c3c" fill="none" r="96" cy="128" cx="128"></circle><path stroke-width="24" stroke-linejoin="round" stroke-linecap="round" stroke="#e74c3c" fill="none" d="M152,84H111.8L104,132.2a28,28,0,1,1,0,39.6"></path></svg>
SVG Icon Code for Number 6
For Green (Pros)

<svg viewBox="0 0 256 256" xmlns="http://www.w3.org/2000/svg"><rect fill="none" height="256" width="256"></rect><circle stroke-width="24" stroke-linejoin="round" stroke-linecap="round" stroke="#27AE60" fill="none" r="96" cy="128" cx="128"></circle><line stroke-width="24" stroke-linejoin="round" stroke-linecap="round" stroke="#27AE60" fill="none" y2="76" x2="136" y1="130" x1="103.8"></line><circle stroke-width="24" stroke-linejoin="round" stroke-linecap="round" stroke="#27AE60" fill="none" r="28" cy="144" cx="128"></circle></svg>

For Red (Cons)

<svg viewBox="0 0 256 256" xmlns="http://www.w3.org/2000/svg"><rect fill="none" height="256" width="256"></rect><circle stroke-width="24" stroke-linejoin="round" stroke-linecap="round" stroke="#e74c3c" fill="none" r="96" cy="128" cx="128"></circle><line stroke-width="24" stroke-linejoin="round" stroke-linecap="round" stroke="#e74c3c" fill="none" y2="76" x2="136" y1="130" x1="103.8"></line><circle stroke-width="24" stroke-linejoin="round" stroke-linecap="round" stroke="#e74c3c" fill="none" r="28" cy="144" cx="128"></circle></svg>
Just copy and paste the codes to make use of it.
GenerateBlocks Pro users get a feature called as Asset Library. The Asset Library in GenerateBlocks pro lets users to save their custom shapes and/or SVG Icons.
This not only lets premium users to save their assets in one place but also use them directly while designing.
Conclusion
I hope you enjoyed this guide and will try to create pros and cons table using GenerateBlocks.
GenerateBlocks is a do it yourself type of a plugin. For example, if you want to create multiple sticky widgets in sidebar or latest posts on homepage, with GenerateBlocks you can easily make it.