If you want to show your most recent posts on a WordPress site, then you will have to create the latest post section. In this article, we are going to see how one can create the latest posts using GenerateBlocks plugin?
Mostly, you get to see these sections on the homepage of a site or in a sidebar as a widget.
Whether you see it on a home (front) page or a sidebar, the technique of creating the latest post section is the same. Especially, after the GenerateBlocks 1.5 and 1.7 major updates, it is now possible to create this with the free version of the plugin.
In case you want to learn more about the update, check out GenerateBlocks 1.5
Consider this as a GenerateBlocks tutorial post.
Displaying the latest posts always helps your readers in learning about new content from your site. It also helps to keep your visitors actively engaged with your newer posts. As a result, giving good SEO signals to the search engine.
Why Create The Latest Posts Section?
The latest posts are equally important as older posts and/or evergreen posts.
Posts that are a little older, or have very high-value retention for users in an industry, often get a good amount of traffic.
As a content creator or a website owner, you also want your latest content to get an almost similar level of traffic. Creating the latest post section helps your users in identifying the most recent written posts. Giving them a chance to click and read them.
This technique helps in bringing traffic to those posts that are yet to land on the high rankings of the SERP.
Absorbing more and more content from you helps in building trust between you and your reader. Your readers will start commenting on your posts, and eventually might even sign up for your newsletter.
Plus, some premium WordPress themes like GeneratePress do not come with this feature. We understand that their developers do not want to bloat their themes with lots of features.
However, the GP premium (GeneratePress premium) gives you a feature called Elements, that lets you build anything on your site.
Note:- We will be using GeneratePress Elements to create our latest posts section.
Before we learn how to create the latest posts using GenerateBlocks, let us understand why we need GenerateBlocks and what are the limitations of using the core Gutenberg latest post block.
Gutenberg Latest Posts Block vs GenerateBlocks
Gutenberg has the latest post-block. It is a simple and straightforward block with very limited customization options.
Gutenberg Latest Posts Block
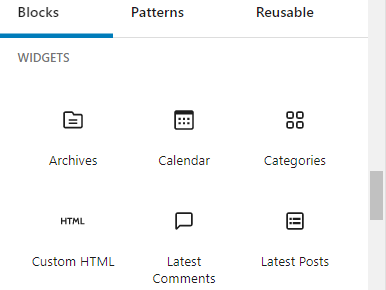
Available under the Widget section of Gutenberg blocks, on the left hand-side of your editor.
Following the basic querying mechanism of your most recent posts on your WordPress site, this block offers the number of posts to display settings, and most importantly, number of columns to display.
As soon as you select the core latest posts block, you will see something like this;
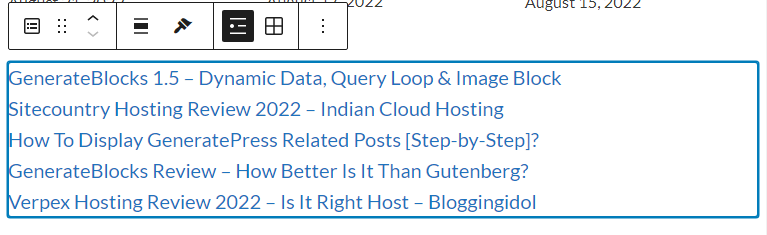
Now, this result in its own way fulfils the feature of keeping the latest post section on your site. But, gives a very bland look, especially if it’s used on a homepage.
It misses the featured image thumbnail, post author, date posted, etc. Well, some basic customization is available. But that’s it.
Let’s take a look.
This is by far the core block that can get customized.
There is a huge lack of spacing options like margins, padding, and gutter width. Aligning post titles, other typography and color settings must be done via custom CSS.
Plus, there isn’t any option for changing background color. That’s a must if you want to make the section appear differently, pulling the user’s attention while browsing your site.
If you are using a particular theme of keeping a few pixels of border radius and box shadow to all your images on the site, then the setting must be done via custom CSS as well.
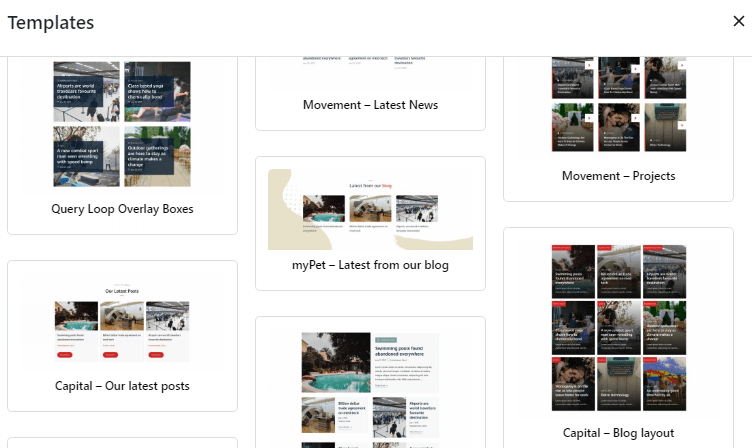
Examples of the Latest Posts Using GenerateBlocks
On the other hand, GenerateBlocks lets you create your own stylized latest post section.
A simple latest posts section with 6 posts showing featured image thumbnails with border-radius and post titles aligned in the centre.
Plus, a Browse More link that takes you to the site’s main Blog Page.
Generally, theme creators do not give this type of feature or addon in their theme. For example, I never got this extension with GeneratePress.
Hence, I created the latest posts in GeneratePress theme and displayed the section on my website’s homepage.

The next example is a little complex section. Holding a two-column grid with the latest post in the left container. Followed by, remaining posts in order, within the right container.
Notice the post title’s horizontal and vertical centre alignment with post thumbnails.
Plus, a View All Articles link takes the visitor to this site’s Blog Page.
Create Latest Posts Using GenerateBlocks
Remember how we created GenerateBlocks related posts. Similarly, we need to create a GeneratePress Block Element and then use GenerateBlocks to add the Query Loop Block, which does all the querying of recent posts.
Finally, styling the Post Template itself using Spacing, Typography, Colors, and Dynamic Data customization options available in GenerateBlocks.
Styling it will make your latest post section look very much like the pro query loop designs made for you as GenerateBlocks templates.
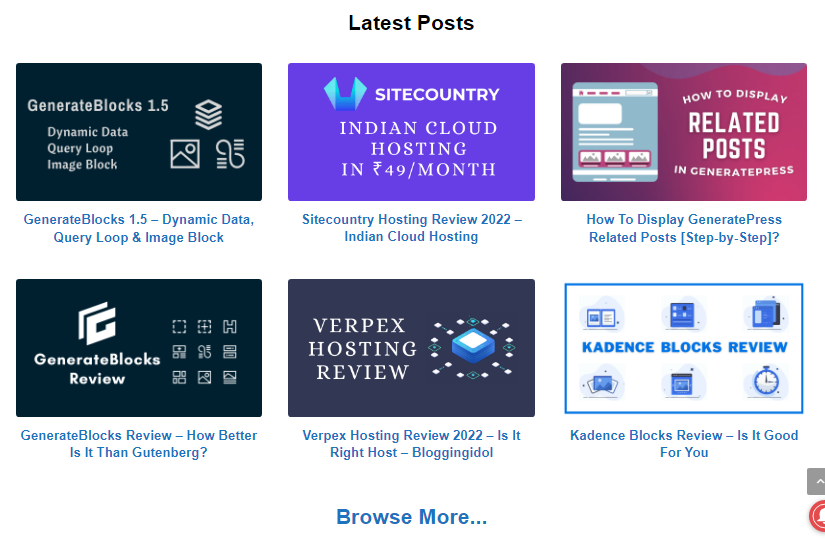
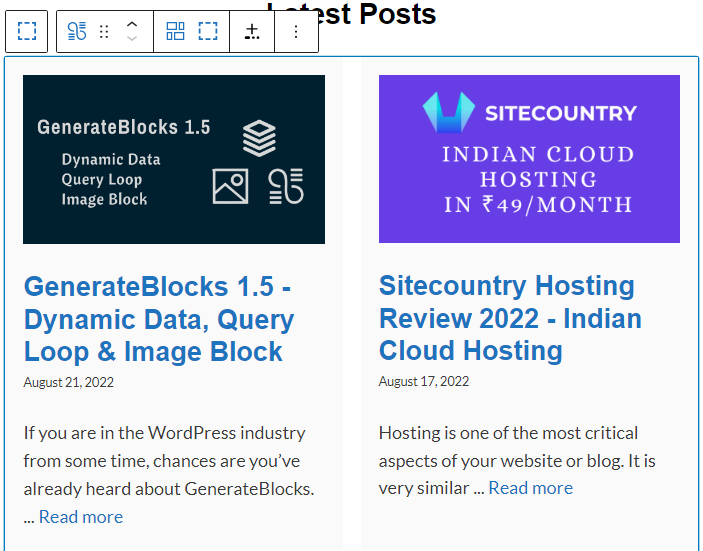
To put it briefly, we will try to achieve the following result.
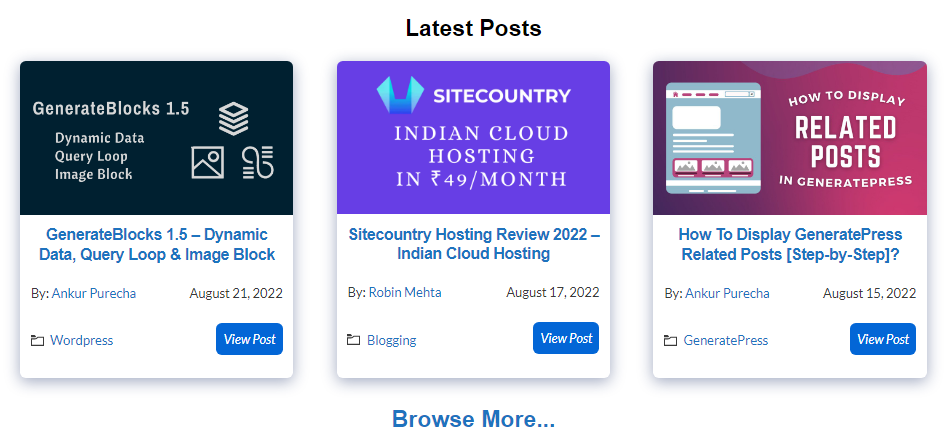
A beautiful card-based 3-column GeneratePress grid layout, with enough gutter-width to showcase the box- shadow around the cards.
Step 1: Create A GeneratePress Block Element & Apply Hook
To create a GeneratePress Block Element, go to your WordPress Dashboard, hover your mouse on Appearance, and click on Elements.
From there, click on Add New Element, and select Block from the drop-down list.
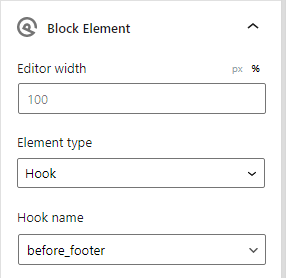
Set Editor Width according to your site container (optional).
Select Element Type as Hook. Finally, set the appropriate hook. Let us say you need this on the homepage before the footer section.
For that area, you’d need to select ‘generate_before_footer’ hook.
Note:- If you are creating a GeneratePress content template to create a single blog post template, then you do not need to perform step 1.
Step 2: Add A GenerateBlocks Container Block
To design your latest posts section, start by adding a GenerateBlocks Container Block. Set the container layout as Full Width or Contained Width, depending on your home page’s layout.
Follow it up, by adding a GenerateBlocks Headline Block with the name ‘Latest Posts’. Make sure the heading is with an H2 tag name.
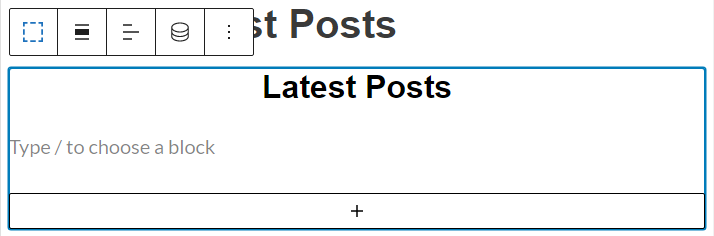
I have aligned the headline block to the center. You can keep it left aligned.
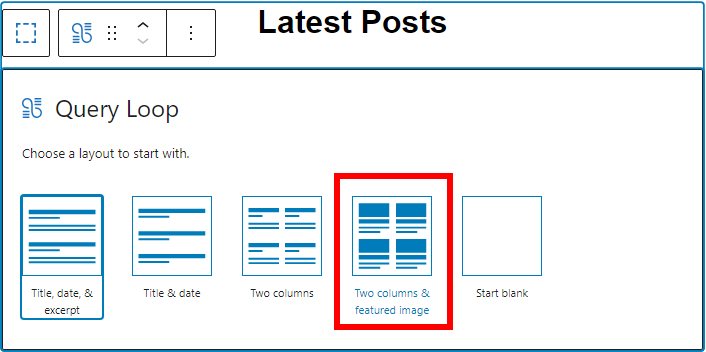
Step 3: Select GenerateBlocks Query Loop Block
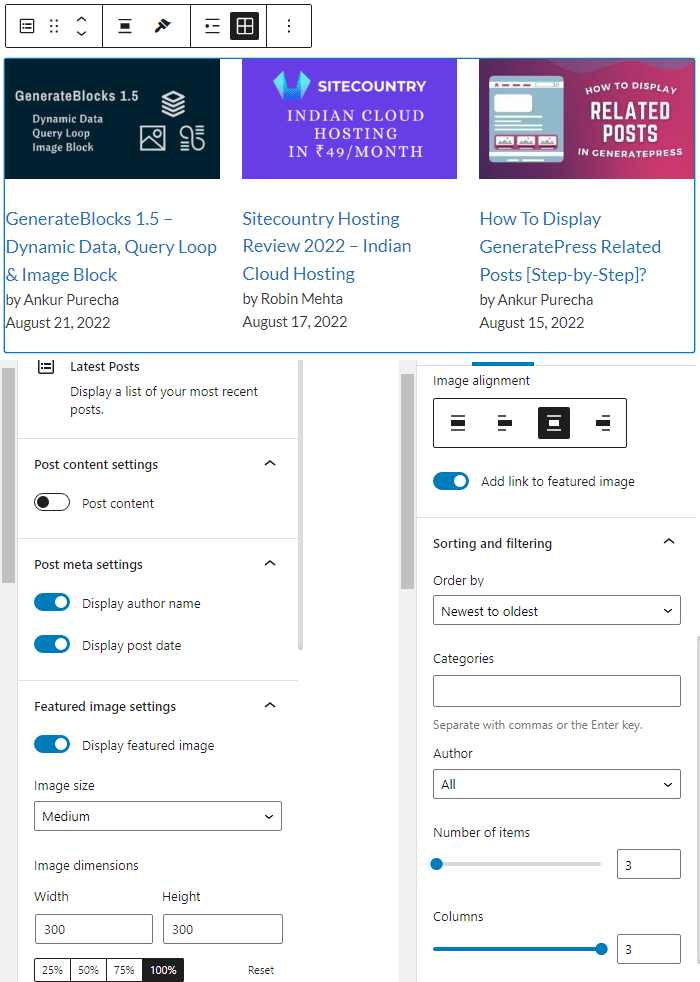
Within that main Container Block, add a new block called GenerateBlocks Query Loop Block, and start with a Two Columns & Featured Image Layout.
Once selected, you will see a section something like this.
You get a the post featured image, post title, post date, excerpt, a read more link, with 10 posts per page (by default) in this query loop.
Note:- Since, GenerateBlocks is created by the developers of GeneratePress, this block is also called as the GeneratePress query loop. Do not accidentally select the Gutenberg query loop.
Step 4: Customize GenerateBlocks Query Loop Posts Per Page
By default, the Query Loop Block in GenerateBlocks displays 10 posts per page. Meaning, in query loop section.
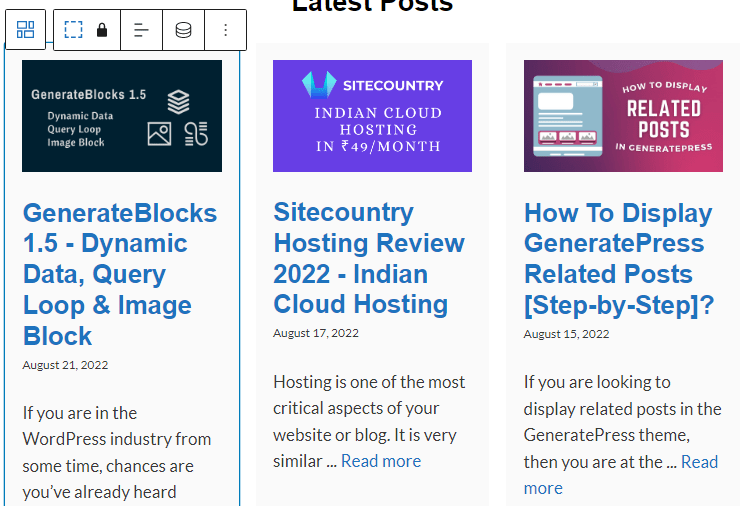
We are going to bring it down to 3 posts per page. You can keep 6, in two rows or 4 in one single row.
Under the List View, click on Query Loop Block and on the right side reduce the number of posts to 3 posts per page.
Remember from our previous step, the Post Template layout will display only 2 columns in a row. Therefore, that has to change.
Step 5: Changing Post Template Layout
Click on the Query Loop Block and that will drop down to show you a Grid Block.
Note:- The beauty of GenerateBlocks Query Loop Block is that, these blocks are all pre-made for you.
Drop down the Grid Block and click on Post Template Block. This is the GenerateBlocks Query Loop Post Template Block.
Change the layout from 50% to 33.33% converting a two column grid to a three column one.
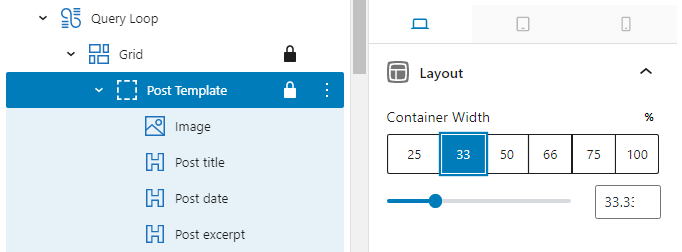
This will result into something like this.
From now on we have to perform all the major design customization steps.
Step 6: Remove Default GenerateBlocks Query Loop Post Template Padding
The GenerateBlocks Query Loop Block comes with a default Post Template that has already got some pre-applied styles like padding, typography, background color.
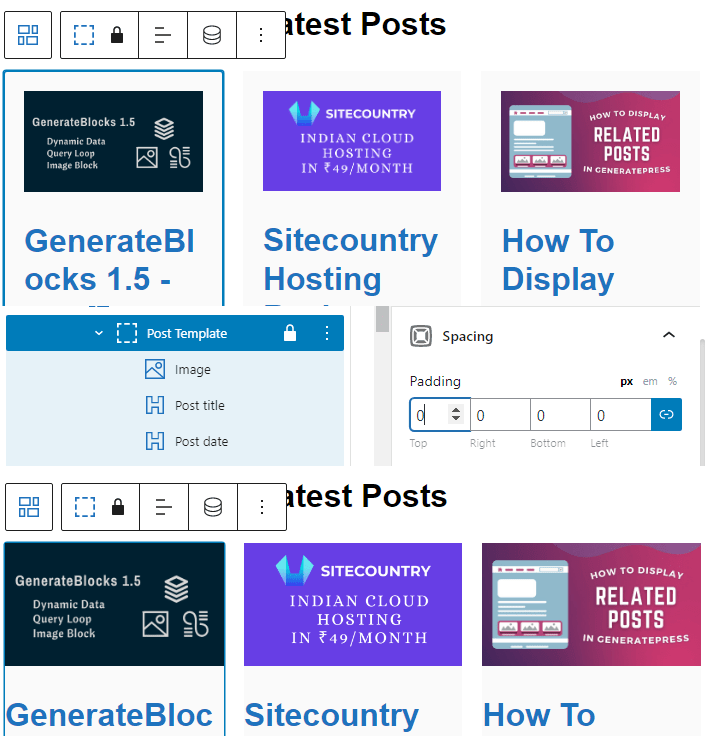
You need to remove the Post Template’s default overall padding of 20 pixels. In order to later on give your own custom paddings and margins.
Notice the crisp edges of the image thumbnails.
Note:- This padding was applicable on every element within the Post Template.
Step 7: Add 3 New Container Blocks
To fit the Post Title, Author Information, Post Date, Post Category, and View Post/Read More Button, we need to add 3 GenerateBlocks Container Blocks under the Post Template.
Remove Post Title, Post Date & Post Excerpt from the existing Post Template.
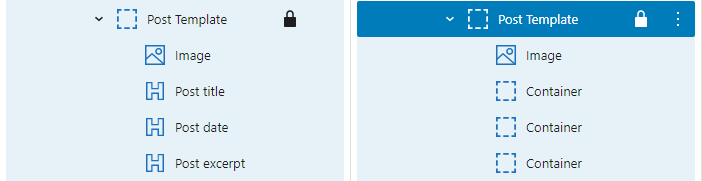
Replace them with 3 new Container Blocks.
We did this for two reasons.
- For gaining total control over spcing options for all the elements
- In our experiment, each row has a 2 column grid within the cards
To avoid further confusion, I am going to give ids to the three main containers.
- First Container Under Post Template – ID = 1st Con
- Second Container UNder Post Template – ID = 2nd Con
- Third Container UNder Post Template – ID = 3rd Con
Note:- To define custom name (give ID) to each container, go to HTML Anchor and define custom name.
Step 8: Add Post Title To 1st Container Of Query Block’s Post Template
This activity is done dynamically, you do not have to do this for all the three column cards.
Click on the first container, from the one created in the previous step and add a GenerateBlocks Headline Block, change the text alignment to center, and change the heading tag name to H3.
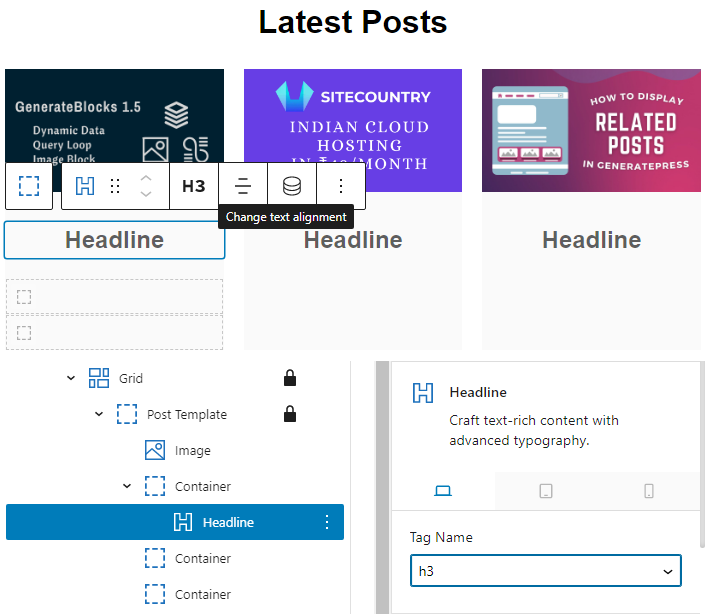
Since, the heading of this section has already got ‘Latest Posts’ as a H2 tag, it is a good UI practice to change the post titles from H2 to H3.
Now, we will need to add Dynamic Data to our Post Title and customize its typography and bottom margin.
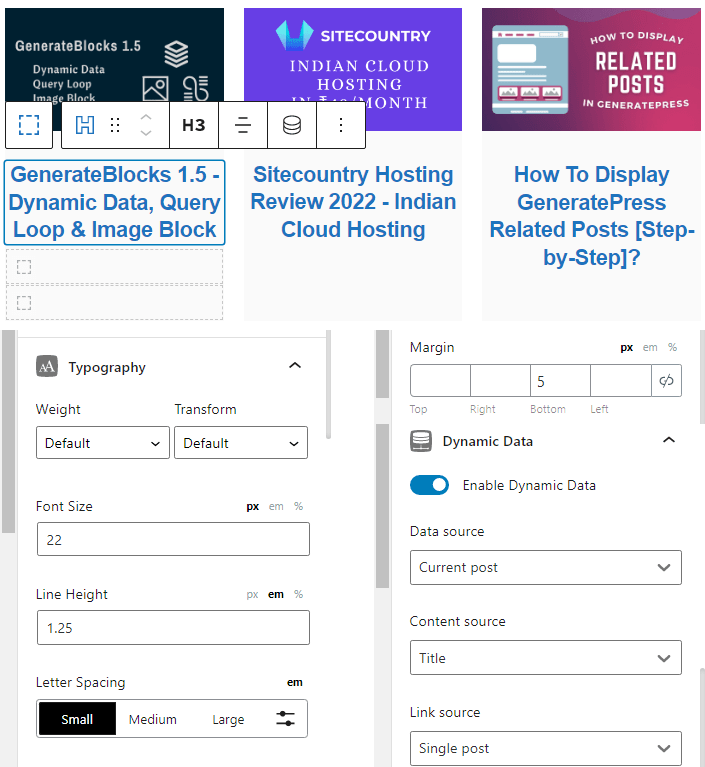
Finally, you need to add overall padding of 10 pixels to the post title’s container block.
Step 9: Add Post Author & Post Date To 2nd Container
Click on the 2nd Container block (of the post template) and add a Grid Block of 2-column layout.
This will automatically create 2 container blocks within the grid.
In the first container of the grid, add a Headline Block, and change the tag name to Paragraph.

Customize Dynamic Options of the headline block to set Post Author, apply Author Archives link and change font size.
In the second container block of the grid, add another headline block and set the alignment to the right.
Change its tag name to Paragraph, font size to 18 pixels, and enable Dynamic Data on the left hand-side.
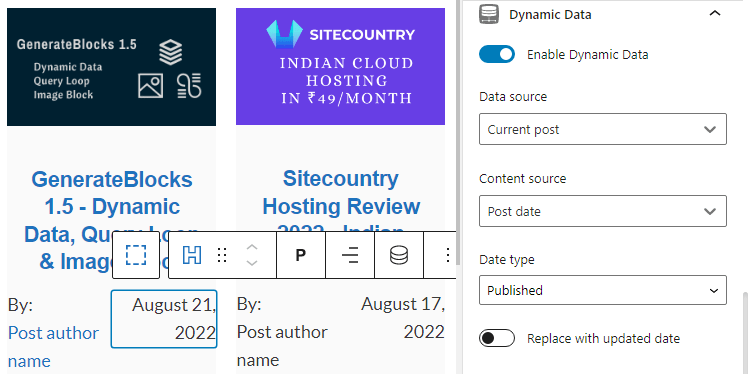
Under Dynamic Data settings, leave the Data Source to Current Post, change the Content Source to Post Date, and leave the Date Type as Published.
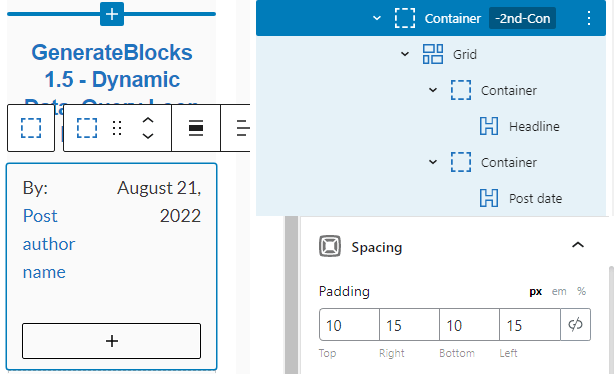
Finally, customize the overall padding of the Post Template’s 2nd container block.
Step 10: Add Post Category & View Post Button To Latest Posts Section
Just like the previous step, similarly add a Generatelocks Grid Block of two columns, to the Post Template’s 3rd Container.
Under the Grid Block’s first container, add a Headline Block and change the tag name to Paragraph, change font size to 18 pixels.

At first, enable Dynamic Data. From then on, leave Data Source to Current Post, change Content Source to List of Terms, select Categories as Taxonomy, and finally for Link Source select Term Archives.
Under the List View, this Headline Block will now be displayed as List of Terms Block.
Enabling dynamic data will call the appropriate category name, linking to their main category pages.
For adding an Icon before the category name, copy the below SVG code and paste into Icon field.
<svg xmlns="http://www.w3.org/2000/svg" width="24" height="24" viewBox="0 0 24 24"><path d="M22 7v13h-20v-10h5.262c2.169 0 3.417-.944 5.812-3h8.926zm2-2h-11.668c-2.659 2.292-3.512 3-5.07 3h-7.262v14h24v-17zm-16.738 1c.64 0 1.11-.271 2.389-1.34l-2.651-2.66h-7v4h7.262z"></path></svg>For the next container in the grid block, choose the GenerateBlocks Buttons Block.
Click on the main button container, and change alignment to right.
Replace default text to Read More or View Post, change typography font size to 18 pixels, and change font style to Italics.
Enable Dynamic Data to the GenerateBlocks Button Block.
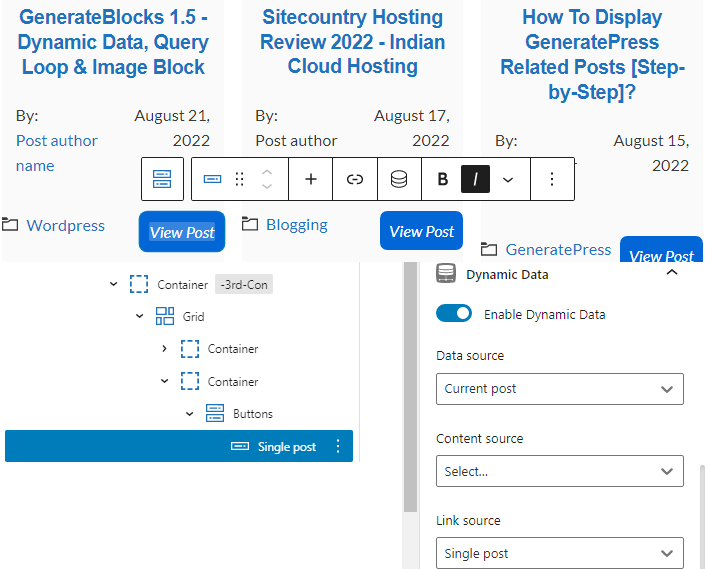
Beginning with, Data Source as Current Post, and finally select Link Source as Single Post.
As soon as do this, the Button Block will display name as Single Post.
Also, change the padding around the text of the button.
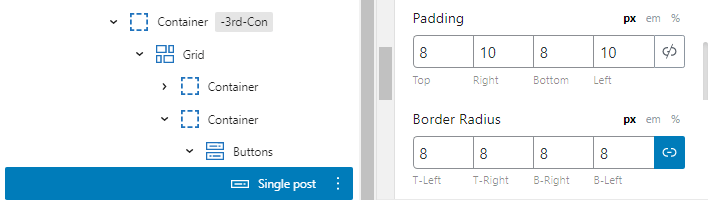
Finally, give overall padding of 10 pixels to the 3rd Container of the Post Template.
Step 11: Remove Background & Apply Box Shadow Custom CSS
If you were working with the GenerateBlocks Pro version then you could choose pro query loop designs from the GenerateBlocks pattern library.
But, that is not the case. This post is specifically made for users that are using the free version of GB, and want to create latest posts using GenerateBlocks.
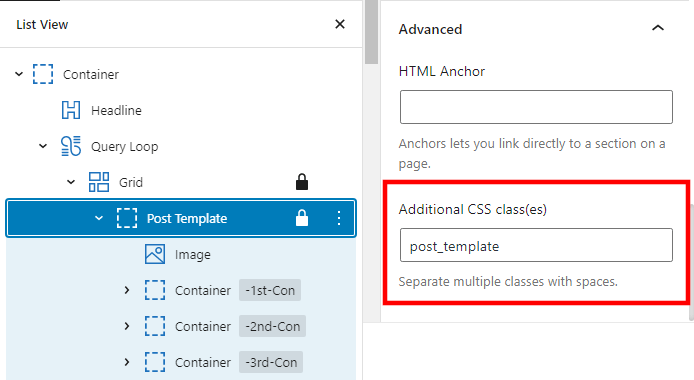
For removing the background from the Post Template, open List View and click on Post Template. Under Colors, clear the background color.
Now, add the following Custom CSS code to your Additional CSS section, in the theme customizer.
.post_template{
	-webkit-box-sizing: border-box;   box-sizing: border-box;
  box-shadow: rgba(23, 43, 99, .4) 0 5px 20px!important;
	border-radius: 8px;
	overflow: hidden;
	}
Here, the custom CSS class (user-defined) is post_template. Add this class to Additional CSS Classes under the Advanced section.
Step 12: Apply Gutter Width To Your Card-Based Latest Posts Section
This is the final customization step where you give some touch-up to your already created latest posts section.
In the previous step we added custom CSS that had a webkit box and box shadow on all the four sides of the card.
For the effect to show its true appeal, you will need to create space between the actual cards.
That is done by increasing gutter-width. Here in GenerateBlocks, simply click on Post Template and add 20 pixels to right margin and left margin.
Note:- Visitors need to check other posts as well. Therefore, add a Headline Block in the end with a link to your Blog Page.
Step 13: Apply Display Location To Your Block Element
After creating this section, you will need to apply a display location to your block element.
I wanted to showcase this on my site’s home page. Therefore, I chose location as Front Page.
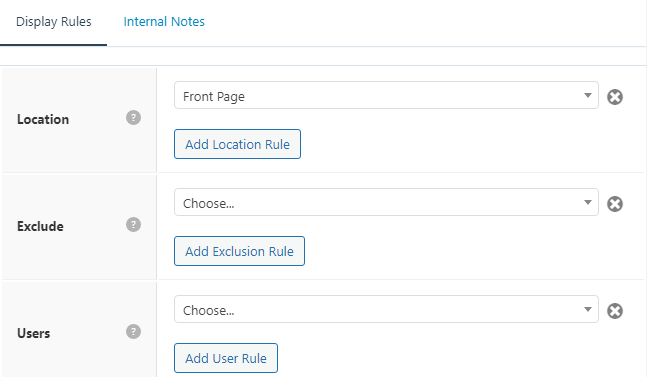
You can add this anywhere you want.
Summary – Latest Posts Using GenerateBlocks
Now, you can check the final result on your website’s home page. It should look something like this.

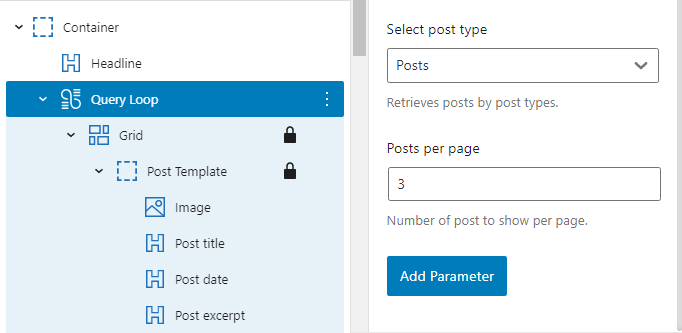
Below, is the image of the List View showing all the blocks from GenerateBlocks required in creating the latest posts section.
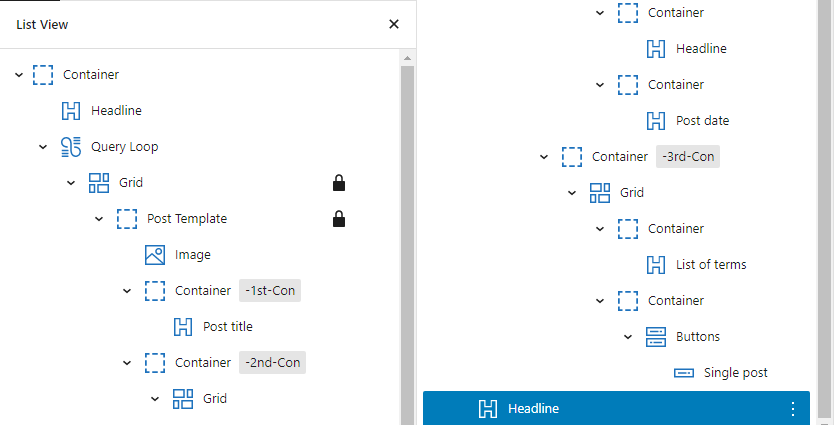
This is totally for your reference. Since, GB is so flexible, you can create latest posts using GenerateBlocks in your own way. For example, you can write some CSS codes to create overlay and hover effects for every card.
GenerateBlocks Latest Posts – FAQs
Related posts show posts which are related to the current blog post the visitor is reading or has read. Whereas, latest posts in WordPress displays all or a certain number of latest posts that have recently been published by the website owner.
GenerateBlocks is available as a free and premium plugin as well. The free version can be downloaded from WordPress. You have to only pay, if you go for GenerateBlocks Pro.
Few or very limited designs can be freely used from the GenerateBlocks pattern library. Otherwise, most of the GenerateBlocks templates require you to have a GB pro version.
Conclusion
I hope you have understood how to make latest posts. Try implementing on your website, and let me know if you need help or require some other design layouts of latest posts.