This is one of those Kadence tutorials where you will be learning how to create a Kadence Sticky sidebar globally, via the Kadence theme customizer, and individually – on a post-by-post basis.
Kadence is a popular WordPress theme for the modern WordPress user. It has got lots of customization features in its free version and much more to offer from its pro version.
The Kadence theme allows you to create a sticky sidebar right from the theme customizer as well as enable the last widget sticky option as well.
KadenceWP has made things so simple that a sticky sidebar in Kadence theme can be done by toggling a switch.
No additional CSS, or a separate fixed widget plugin like Q2W3 is needed.
To enable the Kadence Sticky Sidebar
- Go to WordPress dashboard
- Hover your mouse on Appearance
- Click on Customize
- Go to General settings of theme customizer
- Click on Sidebar
- Flip the switch of Enable Sticky Sidebar
- Optionally, flip the switch of Only Stick Last Widget
In the following post we will be learning;
- What is a sticky sidebar?
- How to enable Kadence Sticky Sidebar from the Theme Customizer?
- How to enable Last Widget Sticky in the Kadence theme?
- How to make sidebar sticky using CSS?
- How many sidebar options do you get with the Kadence free theme?
- Dynamic Sidebars in Kadence Pro theme
What is a Sticky Sidebar?
Sticky sidebar is a fixed sidebar on your website, no matter a visitor scrolls up or down your website, that sidebar always stays fixed.
A sticky sidebar is also referred to as fixed or floating sidebar.
Sticky sidebars can have one single piece of content (one widget) taking up the entire fixed viewport space, or multiple widgets displayed in the user’s viewport.
By the way, viewport is the visual portion of the screen. In our case, the screen’s visual portion displaying a sidebar.
Sticking a sidebar is actually a web designing technique. It can be achieved using CSS and HTML or even using Bootstrap.
Nowadays, many WordPress theme developers like KadenceWP, Creative Themes offer this feature within their theme customizer.
Often these modern themes come with a single click toggle switch to enable sticky sidebar.
How to enable Kadence Sticky Sidebar from the Theme Customizer?
Let us look at all the steps in detail, for creating a sticky sidebar in Kadence theme.
Step 1: Open the Kadence Theme Customizer
From your WordPress dashboard, hover your mouse on Appearance, and then click on Customize.
This will open the theme customizer of the Kadence theme.
Step 2: Locate Sidebar Settings in Kadence Theme Customizer
In the Kadence Theme Customizer, click on General, and then click on Sidebar.
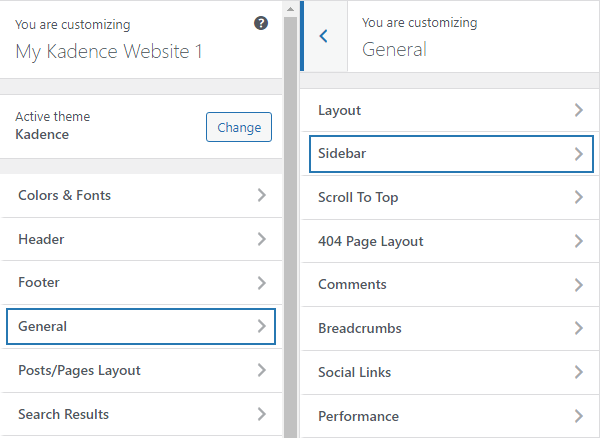
This will open the global sidebar settings in the Kadence theme customizer.
Step 3: Enable Sticky Sidebar in Kadence theme customizer
After opening the sidebar settings, simply toggle the switch to Enable Sticky Sidebar.
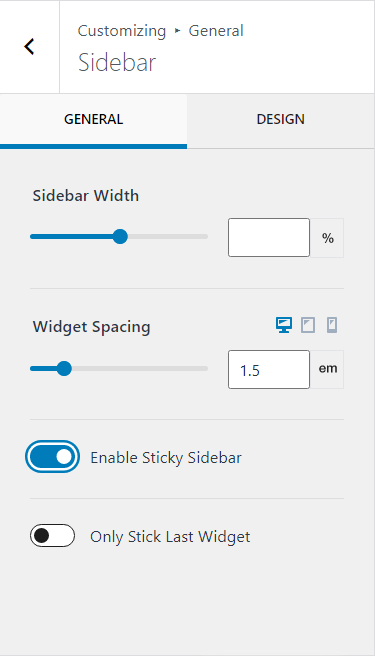
This action will enable sticky sidebar in Kadence theme.
Step 4: Enable Last Widget Sticky in Kadence Theme
In the previous step, we saw how the entire sidebar gets sticky in Kadence theme.
But, what if you only want to stick the last widget of your sidebar on your Kadence website.
Well, that is possible by enabling the Last Widget Sticky option, right under the sticky sidebar option.
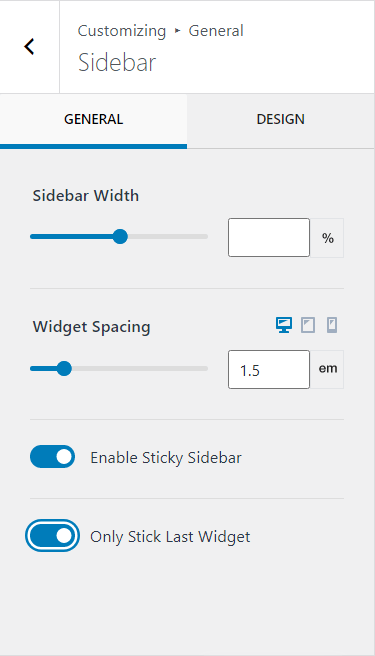
The only difference between an entire sticky sidebar and a last widget sticky on a sidebar is that, the user’s viewport shows all the content that is available only in the last widget of the sidebar.
This type of feature is good for website owners who intend to display more information on their sidebars, and need the last widget (most important widget) to display the website’s most important or most visited pages.
This is how you enable a Kadence sticky sidebar and last widget sticky via the theme customizer.
Enable Last Widget Sticky in Kadence theme using CSS
Optionally, you can also enable the Kadence sticky sidebar using pure CSS.
Go to the Additional CSS option in your Kadence theme customizer and paste the following lines of code.
@media (min-width: 1024px) /**SET WIDTH ACCORDING TO YOUR LAYOUT**/
 {
    #wrapper {
        overflow: visible;
    }

    .sidebar-inner-wrap {
        display: block;
        height: 100%;
    }

    .sidebar-inner-wrap section:last-child {
        position: -webkit-sticky;
        position: sticky;
        top: 25px; /**PADDING FROM TOP**/
    }
}
If your sidebar disappears before 1024px screen size, pick a breakpoint below that. Somewhere around 769px will do the job.
Additionally, you can set a custom top padding, depending upon where your content container starts.
Enable Last Two Widgets Sticky in Kadence Theme
Unlike the Blocksy WordPress theme, Kadence them does not come with multiple widgets sticky option in the theme customizer.
If for some reason, you would like to enable more than one widget sticky on your website, then the following CSS code will help you.
@media (min-width: 1024px) /**SET WIDTH ACCORDING TO YOUR LAYOUT**/
 {
    #wrapper {
        overflow: visible;
    }

    .sidebar-inner-wrap {
        display: block;
        height: 100%;
    }

    .sidebar-inner-wrap section:last-child, .sidebar-inner-wrap section:nth-last-child(2)

	 {
     position: -webkit-sticky;
        position: sticky;
        top: 25px; /**PADDING FROM TOP**/
    }
	 .sidebar-inner-wrap section:last-child{
		 top: 300px; /** ADJUST TOP PADDING OF LAST WIDGET ACCORDINGLY **/
	 }

}
If you have more widgets and want to enable last widget sticky for three widgets then apply one more line of code.
.sidebar-inner-wrap section:nth-last-child(3)This is all there is to stick sidebars in Kadence theme.
Let us now understand how many sidebar options do you get with the free Kadence theme.
Sidebars in Kadence Theme
With the free version of Kadence theme you get to choose between two sidebars from the theme customizer and individually, for every page and post.
- Sidebar 1
- Sidebar 2
This is where you fill your content and make several widgets, from the centralized widget dashboard in WordPress.
For example, if you have a blog website with two categories, then use sidebar 1 for category 1 and sidebar 2 for category 2.
Plus, the page layout, post layout, and archive layout in the Kadence theme customizer offers you a single click option to select right or left sidebar.
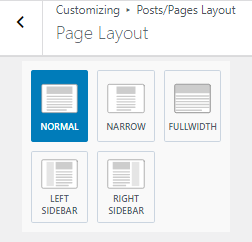
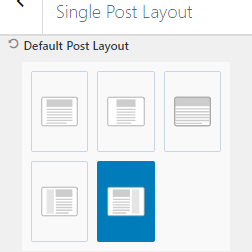
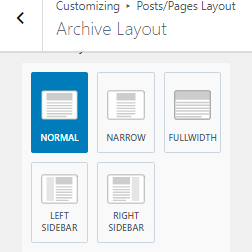
As you can see from the above images, I have only enabled right sidebar for posts on one of my Kadence website.
Note:- Whether you select sidebar 1 or sidebar 2, sticky sidebar feature is applicable for both.
How to use Sidebar 1 and Sidebar 2 in Kadence theme?
Kadence offers you Sidebar 1 and Sidebar 2 in its free and pro version themes.
Do not get confused with them as right sidebar and left sidebar. Understand that you just get two sidebars to fill your content.
But, the main question is, if they aren’t right sidebar and left sidebar, then how to use them.
In the free and pro versions of Kadence theme, you can select right sidebar layout or left sidebar layout for pages, posts and archive, globally and individually.
Globally you select a sidebar layout via the theme customizer.
Plus, you can also select the sidebar layout individually on a page-by-page basis and post-by-post basis.
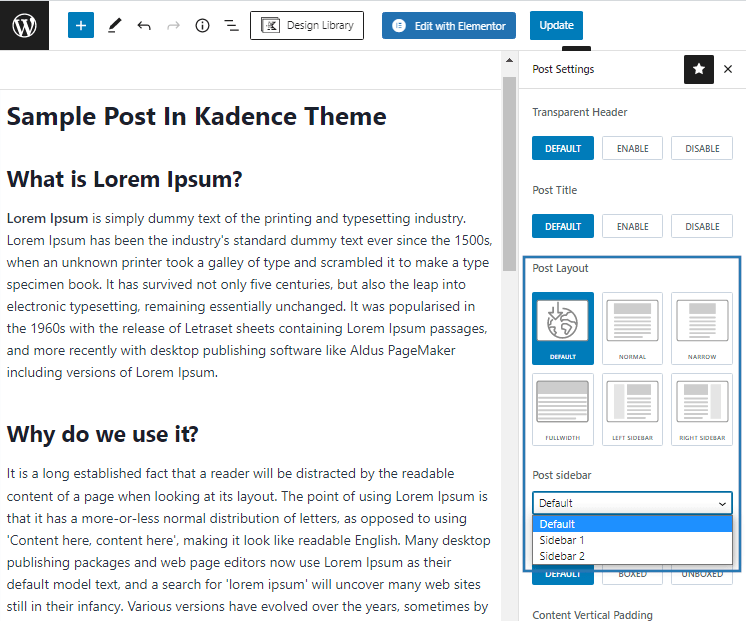
On top of that, you can also select between Sidebar 1 and Sidebar 2 for each and every page and post.
Therefore, you can choose a sidebar layout and the actual sidebar for each page and post.
What if you need more pre-created sidebars?
That feature is not available with free version of Kadence theme.
Dynamic Sidebars in Kadence Pro Theme
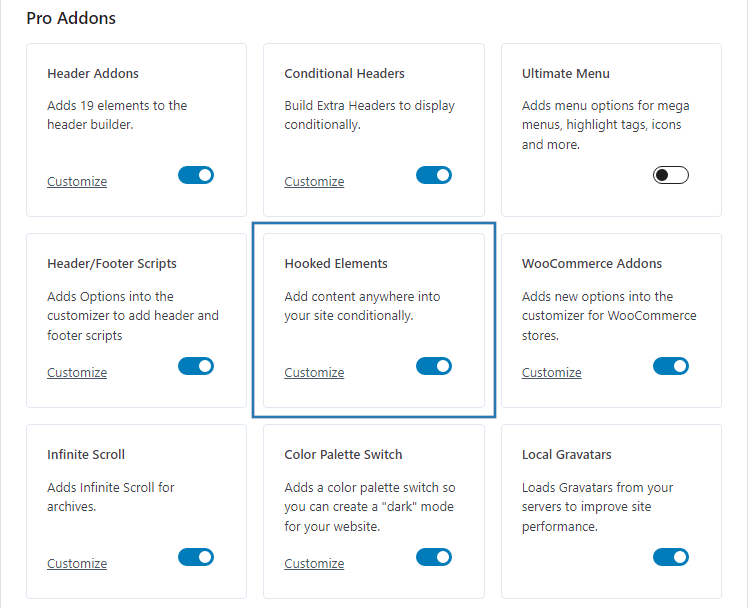
Kadence Pro comes with a feature called as Hooked Elements.
When you install the pro plugin of Kadence theme, you get several features. One of the feature is called Hooked Elements. You just need to enable the toggle switch to start this feature.
Select from Default or Fixed element and choose placement as Replace Sidebar.
This technique automatically replaces current sidebar (sidebar 1 or sidebar 2) with your own custom created sidebar.
Kadence Pro also lets you select display settings to show your custom sidebar on entire site, pages, posts, etc.
For example, if you have three categories on your blog website, and you’ve chosen sidebar 1 for category 1, sidebar 2 for category 2 and sidebar 1 for category 3.
Replacing sidebar 1 with your custom sidebar for category 3, and customizing display settings will definitely display your custom sidebar on blog posts that fall under category 3.
When to use a Sticky Sidebar in Kadence theme?
There are multiple scenarios where you would need to use a sticky sidebar.
The most popular use case is to add a Kadence table of contents section to the sticky sidebar, helping readers go through long blog posts.
Other times when you may consider using a sticky sidebar in Kadence theme are;
- Displaying author profile
- Most popular blog posts
- Showing highly recommended products
- Keeping email opt-ins or boxes that persuade users to join your social communities
Conclusion
I hope you have learnt how to create a Kadence sticky sidebar from the theme customizer as well as using CSS.
Additionally, I have also given the code that helps you to enable last two widgets sticky on the sidebar.
If you have Kadence Pro, you can create dynamic sidebars and apply custom sidebars on a per page or per post basis.
For example, if you have a membership site and already have content on Sidebar 1 and Sidebar 2. You can additionally create two custom sidebars – one for logged in users and another with email opt-in for users who haven’t yet registered.
This way you can put both the custom sidebars to use and also collect new emails.
